DMX Config Tool - Help
Installation
LIGEO™ DMX Config Cable
Plugin the cable to your computer. On modern operating systems the drivers are installed automatically. Windows computers might need internet connection for automatic driver install.
Start the Config Tool and scan for cables. If driver
installation was successful, the cable will be shown in the available cables list.
If there are troubles during driver installation, please check FTDI driver page for manual installation
of drivers for your operating system. You are looking for the VCP (virtual comport) drivers.
LIGEO™ DMX Config Tool
Download the tool for your operating system and extract it.
Note: The tool will create a folder in your home directory in which it stores its configuration.
Windows: c:\Users\xxx\.ligeo
Mac: /Users/xxx/.ligeo
Linux: /home/xxx/.ligeo
Workflow
Setup
Connect the LIGEO™ Config Cable to an USB port of your computer and the other end to the input of the first tube of your installation. Power on the tubes and start the LIGEO™ DMX Config Tool.
Enter Config Mode
The commands send from the Config Tool to the tubes are only accepted byt the tube if it is in Config Mode. To set a tube into Config Mode, do a double click on the controller on the backside of the tube. There is a small hole. Use a toothpick or
small screwdriver to access the button inside the controller through the hole. The tube will start to repeatedly blink double. This signalizes that the tube is in config mode.
Note: you can set more or even all tubes into Config Mode at the same time. But be careful that the same command is then accepted by all tubes. This might be helpful if you want to change the LED Mode of all tubes, but might be unwanted during setup of tube addresses.
Send Commands
Use the Config Tool to send all the necessary commands to the tubes. If the command is accepted, the tube will flash up one time. If the command is not accepted, the tube will flash three times.
Exit Config Mode
To exit the Config Mode of a tube, there are several options:
- Single Click the button on the tubes controller one time
- Click "Live Mode" in the Config Tool
- Click "Restart Tubes" in the Config Tool
Tool Description
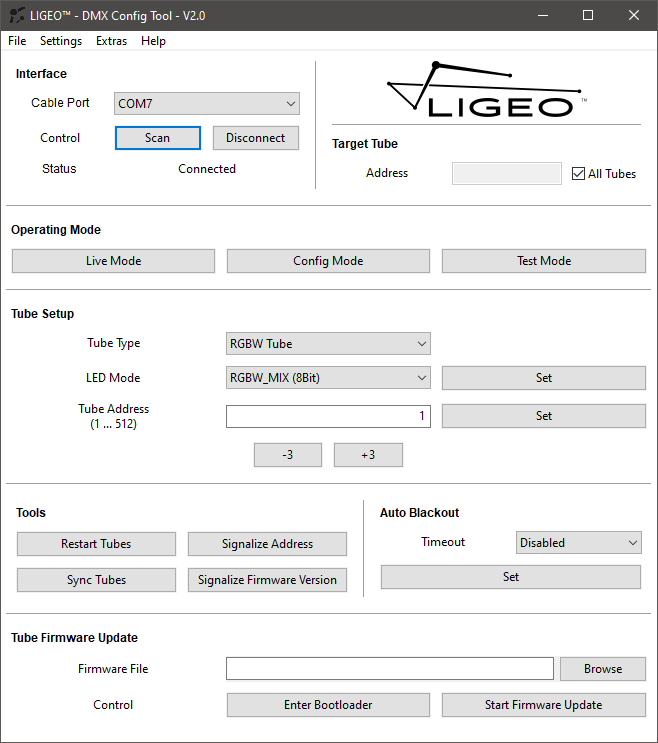
Interface
The detected LIGEO™ Config Cables are listed here. Press the Scan button to search for cables and Connect to connect to the selected cable.
Target Tube
If you want to send the commands only to a certain tube, you can enter the DMX address of the destination tube here. Only the tubes with this address will accept the commands. Normally the commands are send to all tubes.
Operating Mode
Set tubes to Live Mode (play DMX data), Config Mode (accept commands from Config Tool) or Test Mode (all tubes light up their LEDs repeatedly; use for testing tubes and DMX wiring)
Tube Setup
Select the kind of tube first (RGBW or TW).
Select an LED Mode. Detailed information for all modes are listed below. Hit the Set button to set the mode.
Enter a DMX address and click Set to send it to the tubes.
The
+3 and -3 buttons will modify the address in the entry field accordingly. These buttons change to +2 and -2 for TW tubes.
Tools
Restart Tubes
Does what it claims to do
Sync Tubes
Syncs the LEDs of the tubes during Config or Test Mode. Not really needed in real life.
Signalize Address
Signalizes the tubes address by blinking. Decimals are seperated by a short break. Zeros are represented by 10 blinks.
Example: Address is 7 -> blink 7 times
Example: Address is 41 -> blink 4 times - shot break - blink 1 time
Example: Address is 130 -> blink 1 time - short break - blink 3 times - short break - blink 10 times
Signalize Firmware Version
Same behaviour as above, but instead showing the firmware version
of the tube like 4.1
Auto Blackout
Sets the behaviour of the tube when no DMX data is received. It can keep the last value or switch off all LEDs after the selected time.
Tube Firmware Update
Flash a new firmware to the tube. First select the firmware file, then enter the bootloader. The tubes will start fading up/down. After this, start the firmware update. The fading will pick up the pace and a progress bar is shown. Wait until the transfer
is finished.
Do not interrupt the transfer by closing the Config Tool, disconnecting the cables or power off the tubes.
If a transfer was unsuccesful and the tube is not working anymore, you can manually enter the bootloader
and retry the transfer. To manually enter the bootloader, press and hold the button on the backside of the tube during powering it on. Wait until the tube starts flashing, release the button and retry transfer from Config Tool.
Menu Options
File - Exit
Close the Config Tool
Settings - Auto Scan
Enable/Disable automatic scanning for Config Cables at program startup. This setting will be saved.
Settings - Auto Connect
Enable/Disable automatic connection of first detected Config Cable.
Settings - Auto-Set Tube Address after Decrease/Increase
If enabled, hitting the -3/+3 buttons will not only change the value in the entry
file, but also send the changed address directly to tubes with the need to hitting the Set button.
Settings - List all Cable Ports
If enabled, all serial ports of the host computer will be listed. This is helpful,
if the cable is not detected during scanning. This happens sometimes for unknown reasons.
Make sure to select the right serial port if all ports are listed.
To check if it is the right port, select it from the list and connect
to it. Then hit the "Live Mode" button and watch the USB cable plastic housing. It should flash red every time you hit a button in the config tool. If not, disconnect from the port and try the next one.
Extras - Restore Last Tube Address
Restores the last tube address before the current one. Example: Tube has original address 13. It is then changed to 25 via Config Tool. If you select now the "Restore Last Tube Address" option, address 13 is restored without the need to enter it manually.Usecase: Mainly if you accidently changed the addresses of more than one tube and you want to set them back to their previous addresses.
Extras - Factory Reset
Deletes all settings from the tubes and sets them back to the factory settings.
Extras - Check for Updates
Checks if a newer version of the Config Tool is
available
Help - Help
Display this Website
Help - About
Display some information about the tool
LED Modes
RGBW LED Modes
RGBW_MIX (8 Bit)
Tube uses 3 channels (red, green, blue). The white LED insisde the tubes is mixed automatically based on the RGB values (the common value of the RGB input is substracted from red, green and blue channels and
added to the white channel).
RGBW (8 Bit)
Tube uses 3 channels (red, green, blue). The white LED is used only if r,g and b have exact the same value. The white channel is turned on to this value and r,g,b are turned
off.
Use this only for setups where fixed colors are used. Fading through colors will result in strange color behaviour.
RGB (8 Bit)
Tube uses 3 channels (red, green, blue). The white LED is not used.
W (8Bit)
Tube uses one channel for the white LED. Red, green and blue LEDs are not used.
RGBW_MIX (16 Bit)
Tube uses 6 channels (red_msb, red_lsb, green_msb, green_lsb, blue_msb, blue_lsb).
The white LED insisde the tubes is mixed automatically based on the RGB values (the common value of the RGB input is substracted from red, green and blue channels and added to the white channel).
RGBW (16 Bit)
Tube uses 6 channels (red_msb, red_lsb, green_msb, green_lsb, blue_msb, blue_lsb). The white LED is used only if r,g and b have exact the same value. The white channel is turned on to this value and r,g,b are turned off.
Use this only for
setups where fixed colors are used. Fading through colors will result in strange color behaviour.
RGB (8 Bit)
Tube uses 6 channels (red_msb, red_lsb, green_msb, green_lsb, blue_msb, blue_lsb). The white LED is
not used.
W (16Bit)
Tube uses two channels for the (white_msb, white_lsb). Red, green and blue LEDs are not used.
RGBW_MIX (Static)
Tube is setup to a fixed color and does not
react to DMX at all. The white LED insisde the tubes is mixed automatically based on the RGB values (the common value of the RGB input is substracted from red, green and blue channels and added to the white channel).
RGBW (Static)
Tube is setup to a fixed color and does not react to DMX at all.
RGB (Static)
Tube is setup to a fixed color and does not react to DMX at all. The white LED is not used.
W (16Bit)
Tube is setup to a fixed white brightness and does not react to DMX at all. Red, green and blue LEDs are not used.
TW LED Modes
TW (8 Bit)
Tube uses 2 channels (brightness, balance). Brightness controllers the overall brightness and balance the mix from 3000Kelvin to 5000 Kelvin.
TW (16 Bit)
Tube uses 2 channels (brightness_msb,
brightness_lsb, balance_msb, brightness_lsb). Brightness controllers the overall brightness and balance the mix from 3000Kelvin to 5000 Kelvin.
TW (Static)
Tube is setup to a fixed brightness and balance and does
not react to DMX at all.